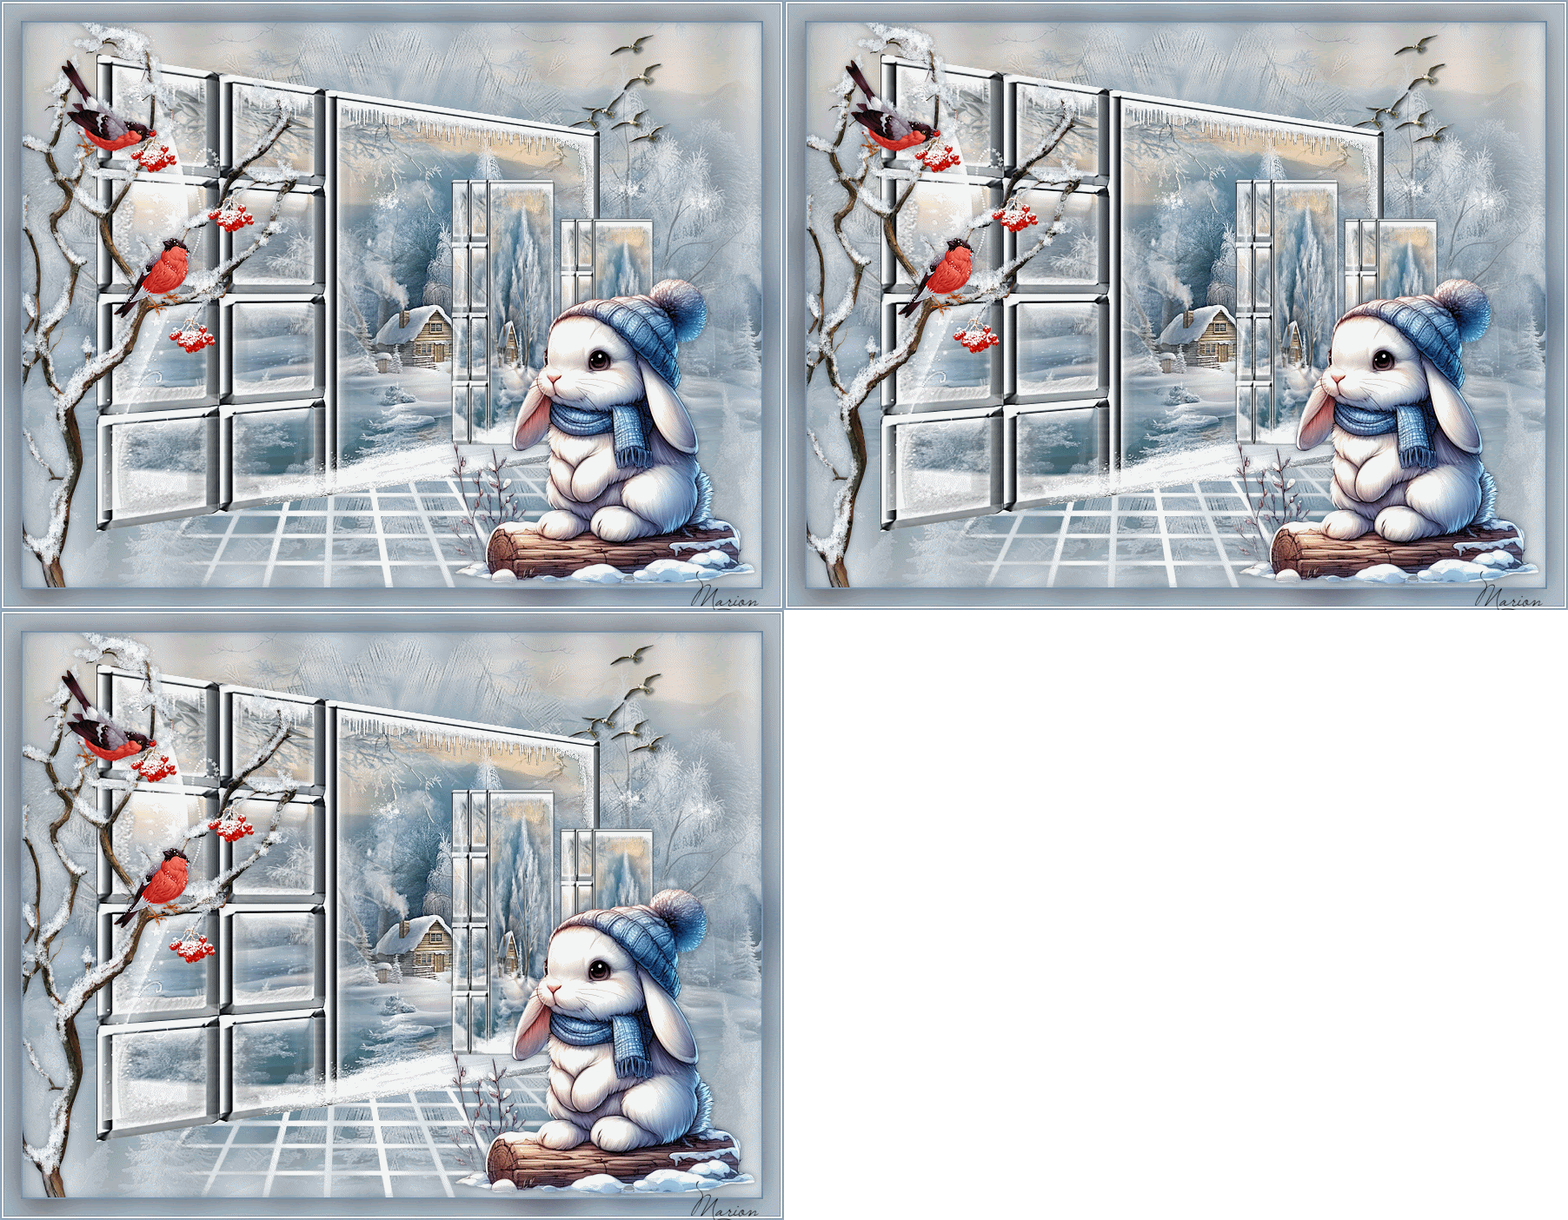
Ice Dream

This lesson was created in PSP 15 but can also be created in other versions
Marion translated this lesson into English
Pinuccia translated this lesson into French
Sylviane translated this lesson into Spanish
I am grateful for the help of the translators of this tutorial.
Click on the flag for the translation.


Supplies
The Template comes from MC Template S-2
Place the pattern Zilverrond- silverpipes - in your pattern folder of your Psp files
The main tube is not at material
**Take a person tube of your choice**
Permission tubes
Here
Plugins
Nik Software Colar Efex Pro3.0 - Tonal Contrast
Materials
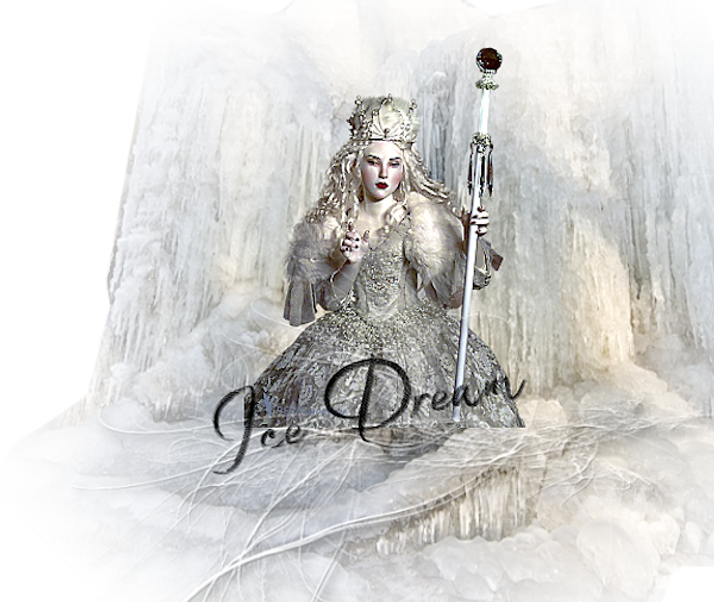
The tubes come from, Jet, NS , Nurso.
If there is a tube of yours, please let me know so I can add your name.
Thanks to all the tube makers and creators for creating these wonderful tubes.
Leave the watermark on the tube intact.
Copyright belongs to the original artist.
Give credit to the creator.
****
The colors, blend mode, and layer density in this lesson are chosen for these materials
****
Step
1
File - Open a new transparent image of this size: 700 x 550 pixels
Step
2
Set your foreground color to pattern search pattern : silverpipes -with these settings
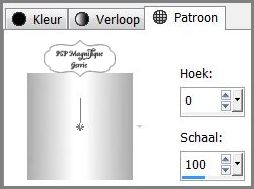
Step
3
Flood Fill Tool-Fill the layer with the pattern
Step
4
Adjust - Blur-Gaussian Blur- Radius 20
Step
5
Selections- Select All
Step 6
Layers- New Raster Layer
Step
7
Activate your background - gargantua-rd-ski.
Edit - Copy.
Activate your work -Edit - Paste into Selection
Selections-Select none
Step
8
Set the blend mode of this layer to Luminance Legacy
Effects- Edge Effects- Enhance
Step 9
Active you misted tube- k@rine dreamsMistedWinter20
Edit - Copy.
Activate your work -Edit - Paste as new layer
Step
10
Image/ Resize by 110%, resize all layers not checked
Slide it a little to the left and slightly upward
Step
11
Effects- Edge Effects- Enhance
Step
12
Activate your misted tube -
NS117211109
Edit - Copy.
Activate your work -Edit - Paste as new layer
Step
13
Effects- Edge Effects- Enhance
Step
14
Selections- Select All
Step
15
Layers- New Raster Layer
Step 16
Activate the tube - Winterraam
Edit - Copy.
Activate your work -Edit - Paste into Selection
Effects- Edge Effects- Enhance
Selections-Select none
Step 17
Layers- Merge- Merge All ( flatten)
Step 18
Put the image aside for now, we will need it later.
Step 19
Open template MC Template S-2 in your Psp
Step 20
Layer palette- Delete the layer- Rectangle 1 - the layer
Platvorm, the layer info,
Step 21
Layer palette, make sure you are on the bottom layer (the background layer)
And then click Delete to make sure that the white background is gone.
Step 22
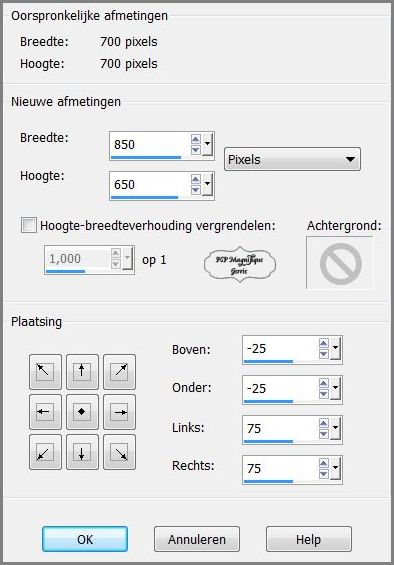
Image Canvas Size- use the settings below
Step 23
Flood Fill Tool-Fill the layer with the pattern

Step 24
Adjust - Blur-Gaussian Blur- Radius 20
Step 25
Layers- New Raster Layer
Step 26
Selections- Select All
Step 27
Activate the tube -emeto_WM_snowy overlay
Edit- Copy
Activate your work
Step 28
Edit - Paste into Selection
Step 29
Selections-Select none
Step 30
In the layer palette - activate layer - "Black Window"
Step 31
Selections- Select All
Selections- Float
Step 32
- Activate the image you minimized in step 18
Edit - Copy.
Step 33
Activate your work -Edit - Paste into Selection
Selections-Select none
Step 34
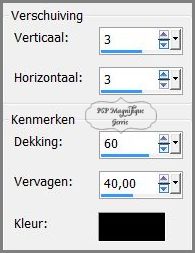
Effects - 3D -Effects - Drop shadow.
Horizontal and Vertical at 3 - Opacity at 60 - Blur at 40- Color black.
Step 35
In the layer palette - activate layer "Rectangle 2"
Step 36
Selections- Select All
Selections - Float
Step 37
Activate your work -Edit - Paste into Selection (image is still in memory)
Selections-Select none
Step 38
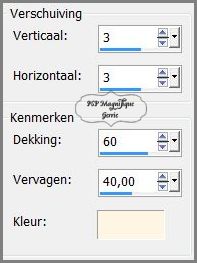
Effects - 3D - Effects - Drop shadow.
Horizontal and Vertical at 3 - Opacity at 60 - Blur at 40- Color #fdf6e3
Step 39
In the layer palette - activate layer " Rectangle 3"
Step 40
Selections- Select All
Selections - Float
Step 41
Activate your work -Edit - Paste into Selection
(image is still in memory)
Selections-Select none
Step 42
Effects - 3D - Effects - Drop shadow.
Horizontal and Vertical at 3 - Opacity at 60 - Blur at 40- Color #fdf6e3.

Step 43
In the layer palette - activate layer Raster with the Mask
Step 44
Selections- Select All
Selections - Float
Step 45
Activate your - Background Ice Dream psp
Edit - Copy.
Step 46
Activate your work -Edit - Paste into Selection
Selections-Select none
Step 47
In the layer palette - activate layer " Floor "
Step 48
Selections- Select All
Selections - Float
Step 49
Flood fill with your pattern " silverpipes ".
Step 50
Selections-Select none
Step 51
Activate the top of the layer palette
Activate the tube "sneeuwuil"
Edit- Copy
Step 52
Activate your work
Edit-Paste as new layer
Put the tube in a nice place
Step 53
Activate your accent tube stars - Element 1
Edit - Copy.
Activate your work
-Edit-Paste as new layer
Align objects top
Align objects right
Step 54
Activate your accent tube - Element 2
Edit - Copy.
Step 55
Activate your work
-Edit-Paste as new layer
Step 56
Place on the left side near the window - (see finished image)
Step 57
Activate the tube "winterbloem"
Edit - Copy.
Step 58
Activate your work
-Edit-Paste as new layer
Slide it on the top- left above the window
Step 59
Effects- Edge Effects- Enhance
Step 60
Activate your chosen Person tube
Edit - Copy.
Step 61
Activate your work
Edit-Paste as new layer
Put the tube on the right side
Step 62
Effects - 3D - effects - Drop shadow of your choice.
Step 63
Activate your tube of a bear O-36
Edit - Copy.
Step 64
Activate your work.
Edit-Paste as new layer
Place the tube on the left side- (see finished image)
Step 65
Layers- New Raster Layer -Apply your signature
Step 66
Layers- Merge- Merge All ( flatten)
Step 67
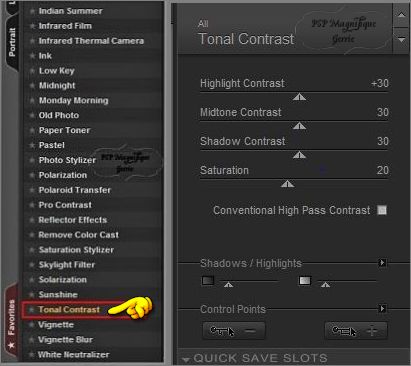
Effects -Plugins- Nik Software Colar Efex Pro3.0
- Tonal Contrast - OK

Step 68
Edit - Copy.
Step 69
Open your animationshop
Edit - Paste - As new animation.
Step 70
Now press your CTRL button and key in the letter L twice.
You now have 3 frames.
Edit - Select all.
Step 71
File - Open.
Find your animation Bling Ice dream
Step 72
Edit - Select all
Edit - Copy.
Step 73
Activate your work
Edit - Paste into selected frame
Place your animation anywhere you like.
Step 74Animation-Frame properties and set to 15
Step 75
If you want to see what your animation will look like, click on the movie strip in your toolbar
(this is the second to last icon on the right)
Animation - Resize animation to 800 pixels.
Step 76
File - Save as gif file - Give a name - Click next 4 times and save your image.
*
*
Your lessons should be no larger than 800 Px for the Gallery
Have you created a lesson and want to share it?
Email - pspmagnifique@gmail.com
If you send me your version, you can see it here
*

This lesson was written by Gerrie on November 28, 2012
This lesson is and will remain the property of Gerrie.
They may not be copied or distributed without my written permission.
All my lessons are my own, so any similarity is purely coincidental.
All of my lessons are registered with TWI prowd member

Seizoen Index
Home
